
I would first like to thank everyone who took the time to give me some feedback on my crewelwork after my last blog post about it, as I was struggling with figuring out why it just wasn't working. I think the best thing about grad school was the amazing people I was around and the constant critique of my work. Now, as the teacher, I am giving feedback to everyone else's work, but rarely getting feedback on my own. I have to search critique out now instead of having critiques built into my schedule. So, a huge thank you to all of you! I greatly appreciated it!
After stepping away from my piece, I emailed Tracy because I could not figure out what parts I should redo for my RSN assessment. She knows that I am a perfectionist. Through the RSN Certificate, I want to challenge myself in learning the technically correct technique with the different types of embroidery, but I also want to challenge myself in how I apply the stitches within the design compositions. I feel that the application is vitally important as it really can change how the stitch is read or how successful the composition is. I want my piece to be the best possible for assessment!
After chatting with Tracy, we decided that I'd redo the straight lines of running stitching that filled the 3 middle parts and the outline of the bottom bit of the left leaf. We thought the straight lines seemed too static and did not match the movement of the rest of the piece and the outline of the bottom bit was too thin and a bit wonky. I thought maybe keeping the running stitch technique, but I'd do them in parallel curved lines for the filling. For the outline, I thought I'd try couching because I had not done any couching on this piece.
Here is where I'm at: I tried to do the running stitch in the same scale as I had done with the straight lines. However, I think with the curved lines they need to be smaller. So this is where the possible next redo comes in. Does the larger scale seem rough?-- is what I keep asking myself.
For the couching, I LOVE couching with goldwork, but I did not anticipate how fluffy it would be between the holding stitches with the wool thread. Lesson for the day: even if you know a technique with 1 material, it should be sampled first in the new material! I say this to my students all the time. Ah!!! Anyways, I like the idea of the couching and how it pulls the pink in just a little, but on the big curve I don't know. I press on! I like it all much better than I did, it still just begs to be better!

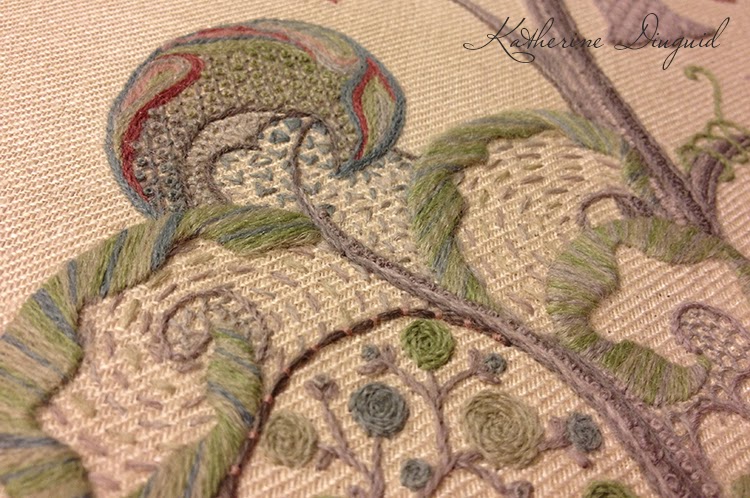


I wanted to compare the scale of the running stitch filling and the overall change in composition by looking at the "before redo" (on left) and "after redo" (on right). It seems they are the same size stitches, but they just seem so much bigger on a curve! I don't mind the size on the lower area of the leaf. On the upper part though it kind of bothers me--mainly because of how it gets a bit wonky when the radius tightens in the innermost 2 rows.
Note: The one area is still bare, I think I'm going to repeat the seeding in there, but I wanted to step back and evaluate everything first. I had also thought maybe repeating the lattice filling to make it heavier? If I repeated the lattice, I thought maybe filling every other hole with a french knot instead of every hole. This way it would be not too heavy but maybe anchor that leaf.
No comments:
Post a Comment