Pages

Showing posts with label silk shading. Show all posts

Thursday, August 6, 2015

Red Clover

Last summer when I was working on my "Weeds" embroideries, we had a large clump of red clover down near our boat ramp.  I found tons of 4 leaf clovers from it and refused to let my husband spray, cut down or otherwise get rid of the clover patch.  It may be odd, but I think clover is a particularly pretty weed and it brings back memories of childhood Spring and Summer afternoons spent making clover crowns and jewelry.  

I got really excited about this patch of clover.  I pressed the leaves and sketched the plants.  Took photographs galore.  It actually became my evening event a few times a week to walk down and see how the clover had changed or if more had bloomed.  

With this piece, I wanted to continue my Weeds embroideries using the scrap gold thread bits but I also wanted to experiment with doing long and short stitch using a Valdani sewing and quilting thread that was variegated.  I LOVE their colors and in studying the clover it was interesting how stripey and veiny the leaves actually are. I thought maybe using this mercerized sewing/quilting thread it would give it that not-quite-smooth texture of the clover leaves and by using the variegated color it would be interesting to see how long and short would use with less control over the color change.  The small leaflets off the stems are padded with a layer of felt under the long and short.

The actual bloom is created by using a mixture of bullion knots (using a different variegated color of the Valdani sewing and quilting thread) and stretched smooth purl.  I padded underneath it with 1 layer of carpet padding and 1 layer of felt.   I wanted the bloom to be pretty dimensional.  The bullion knots and cut purl are worked the same as you would long and short layering the rows in to create even more texture.  Finally, the stem is overstretched tarnished pearl purl couched with the same Valdani thread as the leaves. 


Thursday, August 14, 2014

Frogging

As I have stitched in classes and with friends, a reoccurring topic of conversation is what to call it when you are taking stitches out.  This sometimes painful act can be depressing, defeating, angering, etc.  It makes you want to have a verb that sounds a little more optimistic so that you still feel like you're making some progress.  We have all done it-probably more than we would ever like to admit.  I know for certain that I have taken more stitches out in my lifetime than I have left.  Usually, though, it does end up better after you get past the initial sting of having to take what you have just stitched out.  This summer in Durham, we referred to it as "reverse stitching".  

A few weeks ago, my husband came home from work and asked me if I knew what "frogging" was.  I thought and thought.  Nope, no idea!  He then explained that he had been listening to NPR and they interviewed a knitter.  She said that she used the term "frogging" for when you are taking stitches out because you "rip it, rip it, rip it out".  I fell in love with this saying instantly and now will be calling it that if for no reason to give myself a little chuckle as I am "frogging".  

Have any of you used the term "frogging"?

Here are a couple of my recent experiences frogging.  I have to admit as much as I do not enjoy taking stitches out, I love the photos of the loose ends going every direction! 


Monday, July 14, 2014

Williamsburg: Making Some Progress

I found my super pearl purl!  I could not find it and was starting to get a little worried I was going to have to order more.  Then I found it in the envelope labeled "gilt passing".  I've found that sometimes the gilt threads and wires from different suppliers have a slightly different coloring to them and I really wanted the golds on both sides to match.  It's so exciting to me when the metals start going in.  They seem to automatically add a level dimension to the composition that was not there before.  I also am really liking the stretched pearl purl couched with the different greens. 


I thought everyone might like a sneak at the difference of the two sides.  I am extremely excited to see it when it is finished! 

Saturday, July 12, 2014

Williamsburg: Split Stitching

You know the days where the stitches just do not seem to be falling into the "right" spot?  That was my last night.  I worked on my Williamsburg piece doing some of the leaves and one of the buds.  Towards the end of the night though, I was not happy with how my silk shading was going on the tiny leaves.  They just seemed overworked or not as smooth as I wanted them.   So, I relegated myself to only the split stitching around all the other tiny leaves.  Going to work on the metallic stem stitch today and maybe back to those tricky tiny leaves!


Tuesday, July 8, 2014

Williamsburg 2014: Starting the Other Side

I've started the other side of my piece for the Williamsburg course.  I'd like to finish it in the next couple weeks!  You may see a slight difference in this side though- I've changed the flower color to yellow.  I did not do this because I disliked the pink.  I wanted to see how the yellow interacted with the gold- will it feel monochromatic with the gold?  With the pink flower being a complementary to the green leaves, the pink of the flower becomes the dominate focus of the composition.  I thought it would be interesting to see what would become the dominate focus with an analogous color to the green.  So, it's kind of a stitching color experiment!  

I knew when it was a symmetrical design that I would do the sides differently just for experimentation purposes.  Originally I thought I would do the flowers in a blue color- keep the value similar to the pinks but change it to analogous colors.  However, when I went to my DMC's I didn't like any of the blues, and I thought it might feel too Girl v. Boy.   

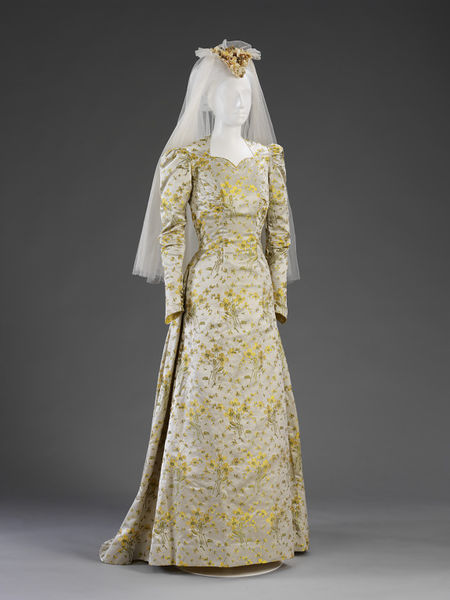
That's when I remembered this beauty from the V&A!   It does not have goldwork embroidery on it, but the it does have just a little bit of gold woven through it.  The main colors are yellow flowers with green steam and leaves on cream. It's part of the Wedding Dress exhibition currently on at the V&A (more on that exhibition soon).
http://collections.vam.ac.uk/item/O125284/wedding-dress-and-dolling-ella/
Elizabeth King wedding dress from 1941, Victoria & Albert Museum, London

 I'm keeping everything else from Tracy's design the same- all techniques will be the same and all green color placement will be the same.  We shall see what happens!  I will admit, I already wish that I had used the medium yellow as the light yellow and the dark as the medium.  When placed on the creamy beige ground, the light and medium yellow are extremely close- closer than I think I was wanting.  Lesson learned!


Friday, June 6, 2014

RSN Silk Shading- finished!

I have finally finished my silk shading for my RSN Certificate!  I look it off my frame last night.  Thank you everyone for your kind and encouraging words with this project!  Now onto Goldwork- yippee!!!!

Here are a few images of the final.  When I was in Williamsburg, Tracy Franklin kindly took a look at it and helped me with one of my issues (mainly the middle blossom).  Per her advice, I added some highlighting to it so that it created the perception of a darker gray.  Does the middle blossom look more rounded and the bottom edge more fluttery? 


Monday, June 2, 2014

RSN Silk Shading- Almost Finished!

Getting close to being finished with this piece!


Williamsburg: RSN Silk and Gold with Tracy Franklin

I love stitching- I know this is no surprise to you.  Part of my love for stitching is the actual act and challenge of stitching, seeing the stitches grow off the material and create new textures and patterns.  However, one of my favorite aspects of stitching is meeting fellow stitchers.  Last week I enjoyed taking the RSN Silk and Gold course with Tracy Franklin in Williamsburg, VA, and I met a lovely group of stitch enthusiasts that reminded me once again why stitching is such a community-based/ inspired/enjoyed art.  So- to my fellow stitchers that I have recently met:  Thank You! for making my time in Williamsburg so wonderful!  And a special Thank You! to Tracy for another wonderful course!

A few photos of Tracy's Waistcoat design that we embroidered with Silk Shading and Gold or metallic threads:


 As you can see, I still had my fair share of challenges with the silk shading!  It started to feel less stressful (which was very exciting), but I still need a lot of practice.   I think I might be able to see that it is going to click with my fingers in the future--which is exciting because I have felt like I have been fighting with this technique (as you know!).
 We made buttons!
 The shading part in the bottom bit of the blossom got taken out a few times!  I'd love to blame it on the lighting in the hotel but in reality my fingers just kept putting in the stitches the wrong way! Practice, practice, practice!
 Buttons finished
 One section getting close to finished
adding in the little leaves


Sunday, May 18, 2014

RSN Silk Shading: Just One More Bit to Go!!!!!!

The more I work on this, the more I am convinced that I need to do some silk shading practice after I submit it on a different project.  This technique is deceptively tricky and I feel like it must become fun after you cross the hump of getting used to blending the thread colors and stitch directions.  I have not crossed it but I'm getting to that point in learning a technique that I really want to understand it more.  

The other thing that I have realized (but I want to talk to Tracy about when I'm in Williamsburg) is that is seems that in order to actually get the shading and color transitions correctly on the stitching, you need to slightly exaggerate it from the photo.  It also may just be because I'm using a photo printed from my printer instead of professionally printed.


Sunday, May 11, 2014

RSN Silk Shading: Ahhh This Last Blossom is Driving Me CRAZY!!!!

So I've redone this blossom I actually cannot remember how many times.  I still don't like it.  It still looks too bumpy and uneven and I have realized I cannot redo it again.  I also think that I needed a darker grey.  The darkest grey that I used is still too light I think so the blossom feels flat.  
Maybe also, I have looked at it for too long . . . anyways moving onto the stem tomorrow.


Monday, May 5, 2014

RSN Silk Shading: Slow and Steady Wins the Race

... at least that's what I keep telling myself as I plod through the silk shading.  I decided to finish off the smaller bits and then go back to the blossom.  All the whites just make your eyes cross!  One more bit done!  I think with silk shading you just have to be able to immerse yourself into it.  The first bit is just a bit painful but then as you work the different colors in the fun appears!  Once this is finished I can get back to my beloved metals!!!


Monday, July 29, 2013

Silk Shading: last blossom!

Pushing ahead with the silk shading!  I'm about halfway finished with the last blossom.  Still a bit to finish, but at least I'll be able to say, "The blossoms are done!".


Monday, June 10, 2013

Silk Shading: Another Bit Done

So, I have accepted that I will be redoing this module.  As I finished this bit, I kept trying to think of all the positives of needing to do the module twice.  The main one I came up with was practice.  I will be thankful for it in the end I'm sure.  The thing that makes me the most nervous about this silk shading is that you are looking at the same bit for so long that I start to really to see all the weirdnesses and I really start to second guess myself.  It kind of all starts to look the same and blend together and I start freaking out that it's just not right.  

Anyways, I thought it might be good to just talk about the struggles I've had with this bit.  The first struggle I had was getting the curvature on the tip right.  I know this sounds easy, but it is a very small sized area and getting it just right was difficult to me.  After a few tries though, I think it did improve.  Next, I'm not sure if maybe my stitches were too long, but I had trouble keeping the smoothness as I moved around the bend towards the bottom.  What I cannot figure out is if the stitching towards the base is stringy looking and overworked or if it's just the stripy quality of the colors.  I needed a darker green, but I feel that the darker green that I used (which was the best of the bunch of my DMC's) is too dark and is too much contrast. 

I am trying though and learning.  I think my biggest struggle is actually working by myself on this.  There is something comforting when you work with a group of ladies that are all learning together.  Thinking of all the fun times over the past few years with the many different women that I've had the opportunity to stitch with . . .