Pages

Showing posts with label RSN Certificate. Show all posts

Saturday, July 30, 2016

RSN Canvaswork: Drum roll, please!!!!!

Here it is, the very last thread tied back for my very last module of my RSN Certificate!  Can you tell I'm just a little bit excited about this!  Now just for awaiting the marks from assessment....
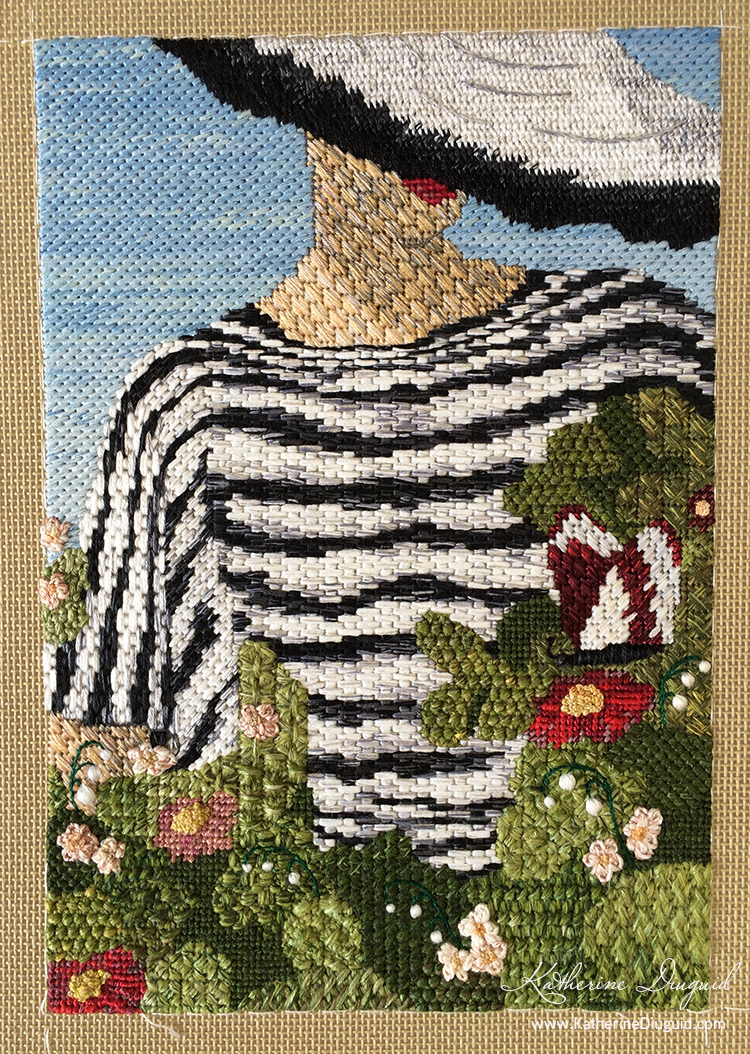
 Here is an image of my final piece.  It is from an illustration that was on the front of UK Vogue in May 1936 for Royal Ascot.  I have to admit I am really pleased with it.  It was a great challenge but I've really fallen in love with this technique.

For some technical information:
The threads are mainly DMC cotton stranded, however, I've mixed in Appleton wools for the greenery and silks and rayons for the butterfly, lips and flowers.  There is tent stitch and trammed tent in the flowers and lips.  Tied gobelin into some encroaching gobelin for the hat.  Parisian and diagonal parisian form the blouse.  All kinds of different cross stitches create the areas of greenery.  I constrained myself to just cross stitch patterns for the greenery as I thought it had a more "bushy" type appearance and I wanted to try lots of different stitch patterns.  The skin is in diagonal satin. The little blossoms are chain stitch within chain stitch.  Finally, the Lily-of-the-Valley are padded satin with a stem stitch stem.
 I had to sneak some Lily-of-the-Valley in somewhere!
Here's a detail of turning the corner of the blouse. 
 I have to admit, canvaswork was a module that I was not originally terribly excited about.  However, I have found that I absolutely LOVE it!  I love the color mixing aspect of it and the constraint of the counted stitch patterns.  I love the textures that the stitches create and the painterly quality of it.  I really cannot wait to start another piece of canvaswork and I already know what it's going to be :)! 

Tuesday, June 7, 2016

Operation "Finish RSN Canvaswork" has commenced ...

I am hoping beyond hope to get this lovely lady stitched up by the time I go to Durham in a few weeks to see Tracy.  I cannot begin to tell you how excited I am to get on the train to stitch with her and my other friends!  I've even started thinking about what I might have for lunch at Leonard's! 

Here's where I ended today, keeping in mind that the left shoulder may come out-- my tweezers and scissors are on standy-by.  The tricky bit is that I do not know of a good way to solve the muddled-up bit around her collar bone (photo below).  

I may try some playing around with the colors I'm plying up.  I thought maybe I could cleverly strand inside the needle to make the transitions more delicate but honestly, I think that may cause more problems because then the jumps will seem bigger.  I've also considered dropping from a 4-2 horizontal Parisian to a 3-1 horizontal Parisian around the collar bone to shoulder.  However, I'm afraid of creating more distracting noise from that change in pattern and I'm not certain if that will actually solve anything.  It is at this moment that I would tell my students to stop saying "but I'm afraid it will" and to sample it out and actually see what it does.  Then again, maybe after I sleep things will miraculously look better in the morning (don't laugh it could happen... usually does not but it could!).  

 
 Progress at end of today.
Problem area.
How I was keeping track with which stripe I was working on.  Seriously, the black and white starts to make you a bit dizzy after a while!  I'm really enjoying all the delicate shading of it and the challenge of the draping on the blouse.  I just have to adjust my eyes more regularly because of the high contrast.
 What happens when your 3 year old discovers the Post It Note arrows.  I can't really blame him as they are pretty fun to play with!


Wednesday, May 27, 2015

RSN Canvaswork: Progress After the Weekend and Day 5

I thought when I was preparing for my canvaswork module that canvas stitches are bigger so that would mean that they would definitely go quicker.  HA!!!!!!!  They do not.  I am really enjoying this technique though and love mixing the colors-- which is a good thing because the color mixing I think takes as long as the stitching.  

This weekend I finished the neck and one side of the sky and put in a bit more greenery.  Yesterday "Take Out Tuesday" struck me with a vengeance.  I spent the morning (literally the whole morning) picking out.  In the afternoon, I started work on the sleeve.  If you will notice, the stripes follow the drape of the shoulder and sleeves and present an interesting problem/challenge for the canvas stitches.  The horizontal stripes are horizontal Parisian, vertical stripes are vertical Parisian and the diagonal fold is diagonal Parisian.  I'm presently working on finishing up the diagonal part before class so Tracy and I can figure out how all these directions are going to meet and follow the shoulder line.  

 Neck in diagonal ground. 

 "Take Out Tuesday" in action

Progress at end of Day 5

Friday, May 22, 2015

RSN Canvaswork: Progress Day 3

At the end of Day 3, I have been working on the stripes for the top and the butterfly.  

I quite like the color mixing and the texture of the canvaswork.  Mixing the threads takes a lot of the time but I think it worth it.  The stripes on the shirt are mixes of DMC stranded cottons and Valdani variegated stranded cotton.   The butterly is composed of mixes of DMC stranded cotton, DMC stranded rayon, DMC stranded metallic, and Valdani variegated stranded cotton.  Maybe I can put the butterfly's body in today so I can say I've finished something! 

For now, on to putting in some more stripes before class officially starts for the day.  The other night I gave myself the homework of pre-mixing all my thread combinations so that is saving a bit of time here in class.  


Thursday, May 21, 2015

RSN: Canvaswork

My last RSN Certificate module has started!!!  I embarked on my canvaswork piece on Tuesday and will be hopefully making loads of progress between now and next Friday.  

The design I am using is an illustration that was on the cover of Vogue UK in May 1936.  It's been a bit tricky knowing who to credit for it as I have come across a couple different credits.  The Vogue UK website credits Alix Zeilinger for the cover, however it was also the illustration for the cover of Vogue US in May 1934 with the dress yellow and black striped.  It's a new thing for me to not use a design of my own as my other modules have all been designs I have created it.  Canvaswork is not a technique I am very used to though and all the ideas that I was coming up with did not seem to be the best for the module at hand.  I have made a couple changes in that I have added more garden at the bottom and have added a couple sprigs of Lily-of-the-Valley (I kind of felt it needed it!).


On Tuesday, I spent most of the day transferring my design and framing up.  I started on the sky towards the end of the afternoon.  I had terrible jet lag and so was not making lots of "fast" progress.  Yesterday, I started more of the stitching working on the greenery and starting the shirt.  Lots more photos to come as I make a bit more progress!
 

Monday, March 30, 2015

Sampling Away . . .

More Samples to come as I am getting lots of suggestions of stitches to try out!  So far, I have tried Florentine, Hungarian, Diamond Satin, Parisan, Milanese, 2-layer Oblong Cross (one sample worked in 2 layers and one sample worked top to bottom overlapping previous row), Smyrna Cross, Rice, Encroaching Gobelin, Straight Gobelin, and Upright Gobelin. 

In addition to trying out the actual stitches, I am also experimenting with mixing different threads and practicing my shading.  I've tested different mixtures of Appleton's Wool, DMC cotton floss (solids), Valdani Cotton Floss (variegated), Valdani Silk Floss (variegated), EdMar Rayon Embroidery Thread (variegated), Gutermann machine thread, and Mettler machine thread.  It is really interesting to see the textures of the threads mixing.  For some of the samples, I think the color mixing takes away from the stitch pattern and for others I think it enhances it.  Lots more samples hopefully to come!  


Monday, March 23, 2015

Getting ready for Britain

This summer I'll be going back to Durham, UK to do my last module on my Royal School of Needlework Certificate of Technical Hand Embroidery.  I am so excited about it!  I'll be doing canvaswork, which is a type of embroidery that quite honestly I am not terribly familiar.  I have not done a lot of counted embroidery.  So, in order to prepare for my course, I've been reading a couple books that Tracy recommended to me, Canvas Work by Jennifer Gray and  Dictionary of Canvas Work Stitches by Mary Rhodes.  I also started sampling stitches yesterday and so far I really, really like this technique!  So far I have stitched 1 square experimenting with Straight Gobelin and Trammed Gobelin and 5.5 squares of Upright Gobelin in various color and material combinations.  I have tried just Appleton wools and mixing in some DMC and some silk too.  I'm working on a 18 tpi canvas in antique as this is what I will be working on this summer.  It is not a very subtle technique it seems.  It seems like you have to be a bit more aggressive in the shading for it to come through and make a difference, but I have a lot more sampling to do!

Any suggestions on stitches to try?  There are so many of them!  
Here's my "to-do" list so far:  Florentine, Hungarian, Diamond Satin, Parisan, Old Parisan, Chevron, Leaf Diaper, Milanese, 2-Layer Oblong Cross, Smyrna Cross, Windmill, Broad Cross, Rice, Oblong Rice, Plaited Stitch, Herringbone, Rococo, Paris, Tent, and Diamond Eyelet.  


Friday, June 20, 2014

RSN Goldwork: . . . . . I'm finished!

So today at about 4:30pm, I finished all the embroidery work for my RSN Goldwork piece.  Pretty excited to say the least, especially after the previous 2 modules took a bit of time after I got home!  All I have to do now is mount it and send it off for accessment.  Yippee!

I thought I would share a couple notes on the "challenges" of this piece:

- The intersections where the blossoms overlapped the stem were especially challenging because it meant that the cutwork needed to meet the pearl purl outlining the blossoms and leaves nicely and appear to go smoothly...all while trying to keep my angle from section to section.  It took me a good number of tries and I will be honest at one time I had to take a bit of a break and go get breakfast at Leonards across from Tracy's studio.  It was a really great challenge for me though and I'm glad that I've done it.  Tracy showed me how I could gently shift the pearl purl out of the way so the smooth purl would sit nicely.  I also found that it was easier to work on those areas by working ground fabric side into blossom intersection than the other way (so I was tucking the stitch into the highest part). 

- At about 3pm today I realized that I had one small stem that overlapped my cutwork.  Panic set it.  How in the world do I cross the cutwork without cracking it?  Ahh!!!!  Tracy's suggestion was to mold it into shape and strategically stitch it down on either side of the stem.  One of her student's had done this for a pair of bird's feet to great success.  It was tricky and I did hit the smooth purl once (thankfully the tiny nick came out), but I think it worked.  It was an unexpected extra detail that I kind of love!

- The biggest challenge in this piece was how the elements overlapped and had lots of intersections.  Something to consider when designing the next piece!  I'm really wanting to do this design again but introduce some color into the mix. 


Thursday, June 19, 2014

Tuesday, June 17, 2014

RSN Goldwork: Progress Catch-up

 Progress at end of Day 4 of class
Progress in the middle of the weekend
 I just loved how the stitches on the back looked like beautiful pad stitching or chicken feet and had such a lovely rhythm to them.
 Progress at end of weekend.  4.5 leaves down.  1/2 a leaf to go (plus the outline of 2 of them).
 Plunging!!!


 Progress at end of Day 5 of class.  Outlining 2 leaves and working on the buds and blossoms tomorrow!


Thursday, June 12, 2014

RSN Goldwork: Day 3


 Applying the first layer of felt padding
 One leaf down, 4 to go!
Progress at end of Day 3

Wednesday, June 11, 2014

RSN Goldwork: Back in Durham

 I am very excited to be back in Durham stitching with some wonderful women at Tracy Franklin's studio.  Monday morning, I got off the airplane, took the train, dropped things off at my hotel and went and walked around.  There was a tour of Durham Castle starting so I joined it.  I had never seen the inside and it was beautiful!  

This time in Durham, I am starting my goldwork module for the RSN Certificate.  When I was starting to plan my design, Tracy recommended that I look at Art Nouveau or Art Deco for reference.  I love the jewelry from these design movements, so started there--with lily of the valley!  Iconically they are my two favorite design periods so I was quite excited about the suggestion.  I wanted the piece to have the flow of Art Nouveau lines and feel fairly simple so I could add the complexity/interest with the stitches and gold threads/wires that I choose. 

Calico framed up, silk long and shorted on, design transfered, design stab stitched . . . ready to start stitching!
 final design
progress at end of Day 2

Friday, June 6, 2014

RSN Silk Shading- finished!

I have finally finished my silk shading for my RSN Certificate!  I look it off my frame last night.  Thank you everyone for your kind and encouraging words with this project!  Now onto Goldwork- yippee!!!!

Here are a few images of the final.  When I was in Williamsburg, Tracy Franklin kindly took a look at it and helped me with one of my issues (mainly the middle blossom).  Per her advice, I added some highlighting to it so that it created the perception of a darker gray.  Does the middle blossom look more rounded and the bottom edge more fluttery?