Pages

Showing posts with label RSN Silk Shading. Show all posts

Friday, June 6, 2014

RSN Silk Shading- finished!

I have finally finished my silk shading for my RSN Certificate!  I look it off my frame last night.  Thank you everyone for your kind and encouraging words with this project!  Now onto Goldwork- yippee!!!!

Here are a few images of the final.  When I was in Williamsburg, Tracy Franklin kindly took a look at it and helped me with one of my issues (mainly the middle blossom).  Per her advice, I added some highlighting to it so that it created the perception of a darker gray.  Does the middle blossom look more rounded and the bottom edge more fluttery? 


Sunday, May 18, 2014

RSN Silk Shading: Just One More Bit to Go!!!!!!

The more I work on this, the more I am convinced that I need to do some silk shading practice after I submit it on a different project.  This technique is deceptively tricky and I feel like it must become fun after you cross the hump of getting used to blending the thread colors and stitch directions.  I have not crossed it but I'm getting to that point in learning a technique that I really want to understand it more.  

The other thing that I have realized (but I want to talk to Tracy about when I'm in Williamsburg) is that is seems that in order to actually get the shading and color transitions correctly on the stitching, you need to slightly exaggerate it from the photo.  It also may just be because I'm using a photo printed from my printer instead of professionally printed.


Sunday, May 11, 2014

RSN Silk Shading: Ahhh This Last Blossom is Driving Me CRAZY!!!!

So I've redone this blossom I actually cannot remember how many times.  I still don't like it.  It still looks too bumpy and uneven and I have realized I cannot redo it again.  I also think that I needed a darker grey.  The darkest grey that I used is still too light I think so the blossom feels flat.  
Maybe also, I have looked at it for too long . . . anyways moving onto the stem tomorrow.


Monday, May 5, 2014

RSN Silk Shading: Slow and Steady Wins the Race

... at least that's what I keep telling myself as I plod through the silk shading.  I decided to finish off the smaller bits and then go back to the blossom.  All the whites just make your eyes cross!  One more bit done!  I think with silk shading you just have to be able to immerse yourself into it.  The first bit is just a bit painful but then as you work the different colors in the fun appears!  Once this is finished I can get back to my beloved metals!!!


Monday, July 29, 2013

Silk Shading: last blossom!

Pushing ahead with the silk shading!  I'm about halfway finished with the last blossom.  Still a bit to finish, but at least I'll be able to say, "The blossoms are done!".


Monday, June 10, 2013

Silk Shading: Another Bit Done

So, I have accepted that I will be redoing this module.  As I finished this bit, I kept trying to think of all the positives of needing to do the module twice.  The main one I came up with was practice.  I will be thankful for it in the end I'm sure.  The thing that makes me the most nervous about this silk shading is that you are looking at the same bit for so long that I start to really to see all the weirdnesses and I really start to second guess myself.  It kind of all starts to look the same and blend together and I start freaking out that it's just not right.  

Anyways, I thought it might be good to just talk about the struggles I've had with this bit.  The first struggle I had was getting the curvature on the tip right.  I know this sounds easy, but it is a very small sized area and getting it just right was difficult to me.  After a few tries though, I think it did improve.  Next, I'm not sure if maybe my stitches were too long, but I had trouble keeping the smoothness as I moved around the bend towards the bottom.  What I cannot figure out is if the stitching towards the base is stringy looking and overworked or if it's just the stripy quality of the colors.  I needed a darker green, but I feel that the darker green that I used (which was the best of the bunch of my DMC's) is too dark and is too much contrast. 

I am trying though and learning.  I think my biggest struggle is actually working by myself on this.  There is something comforting when you work with a group of ladies that are all learning together.  Thinking of all the fun times over the past few years with the many different women that I've had the opportunity to stitch with . . . 


Thursday, June 6, 2013

Silk Shading Progress. . . I think

So silk shading has me quoting one of my favorite books as a child, "The Little Engine That Could"- "I think I can, I think I can, I think I can".  Well,  I am going to give it my best try, but I have this distinct feeling I may be redoing this module.  So I keep trying and keep pushing forward (and taking stitches out and redoing).  It's very much a one step forward and a few back feeling.  I will be so excited when I finish it though, even if I have to redo it!  And, I cannot wait to get back to my crewelwork!


Thursday, March 7, 2013

Silk Shading- progress report

Progress has been a bit slow on my silk shading, mainly due to lack of time to work on it between baby and work.  I've been making time though recently and have been making some progress.  I have a really cute little helper now too!  One more bloom down, now on to the stem!


Monday, July 16, 2012

RSN Silk Shading: Day 8

Below is the progress of my RSN Silk Shading piece at the end of Day 8 of class.  I will be finishing it at home and sending it in for assessment.  I will keep posting updates on it's progress here!


RSN Silk Shading: Day 7

I started the stem on Day 7.  I also picked out the stem on Day 7 and started it again!


RSN Silk Shading: Day 5 and 6

So I did start my bottom blossom on Day 5.  I actually started it a few times that day and that evening!  Let's just say Day 5 and the morning of Day 6 was spent practicing the art of picking out!  Usually I take photos of the bad and the picking out progress, as I think the mangled threads can be very beautiful in a kind of twisted way, but I guess this time I was too into the process of stitching and picking.  I did not realize until after it was all picked out that I had forgotten to photograph it.  Here is my progress though at the end of Day 6:


RSN Silk Shading: Middle Weekend Progress

Below is the progress I made over the middle weekend between my 2 weeks of class.  My goal was to finish the back portion of the leaf so I could start the bottom blossom on Day 5 of class.


Friday, May 25, 2012

RSN Silk Shading: The Design

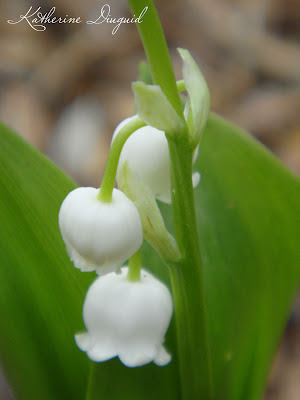
For my silk shading embroidery design, I took photos of the Lily-of-the-Valley in my yard.  I took lots and lots of photos--when they first popped out of the ground and were just buds and once they had fully bloomed.  I finally decided to blend elements from the following 3 images to create my own composition.  


RSN Silk Shading: Day 4


RSN Silk Shading: Day 3

Split-stitching around the bud

Progress at end of Day 3:

RSN Silk Shading: Day 2

Progress at the end of Day 2

Wednesday, May 23, 2012

RSN Silk Shading: Day 1

On Tuesday, I started 2 weeks of silk shading!  Really nervous about this module, but excited too!  For Day 1, I finalized my design, plied my silk onto my calico, transferred my design onto the silk using gouache (after pricking and pouncing), and stab stitched around all the outlines.  Ready to start stitching on Wednesday!