I had not really stitched in months. I know I am not alone in this. Though we find ourselves at home due to Covid-19, so much has turned topsy turvy. I had finally carved out some time to stitch and I wanted to stitch something frivolous and full of joy. Something that was a small project just purely for the joy of stitching.
I started thinking about my absolutely favorite Christmas decoration my Mom had when growing up-- her ceramic Christmas tree. I loved how the ornaments would light up and how you could move them around to different pegs. Recently, I looked them up and found that to my surprise these charming little tress were now "trendy"! A find that both made me giggle and twinge with a bit of sadness. My mom had the traditional green one and there was a small chip in it that just made it more special to me. In my search for images of ones like my Mom's, I found this fun video showing Molly Sanyour, a contemporary potter, creating her own modern versions.
I decided I wanted to stitch my own little tree reminiscent of my Mom's ceramic tree but in my beloved metal threads and wires. I wanted this piece to exude cheer and joy and embrace a slight wonkiness that so many Christmas heirlooms have.
The result was this little Christmas tree created with loops of colored metal purls and combining other metal work techniques with beads and crystals.
Then since it brought me so much joy and since my kids loved this piece, I made it into a virtual workshop and kit to share with others. And, I stitched another one! This time I used a mix of emerald green and Grinch green purls.
And because this one was so much fun, I kept stitching different versions to give to friends. These move fairly quickly and (and this detail is important) is something I can easily stitch for 5 minutes here and there between other responsibilities. I'll share those soon-- I don't want to spoil their surprise!
I wish everyone reading this post a safe, healthy and magical holiday season. As many of us find ourselves having to forgo our usual traditions, I hope we are able to find joy in the tiny details and new ways of celebrating together, and I look forward to when it is safe to gather again. Happiest of Holidays to everyone for whichever holiday you celebrate this season!
17th Century raised work has enjoyed a special place in my heart since I first saw photos of it in textile history books years ago. I love the dimension of the quirkily rendered characters and scenes. I find everything about them absolutely charming and cannot learn enough about the pieces, the history, and the techniques. I am very grateful to have seen many pieces of raised work in museum collections during research trips throughout the UK and USA. Their charm may have captured my attention in black and white photographs but seeing these creations in person, at scale-- it is truly something special.
A few-ish years ago, I started the Cabinets of Curiosity courses with Tricia Nguyen as I have a deep desire to embroider a casket or cabinet of my own at some point in my life. Through her courses I have learned so much and have found many other embroiderers that share a passion for raised work embroidery and a desire to stitch their own casket. It is incredible to me to see how fellow participants use and interpret the 17th Century techniques for their own designs and to see the broad range of themes that are chosen.
I have had this little wooden box in my studio since I first started the Cabinets of Curiosity courses. The course materials seemed so precious to me that I had wanted a box that was not too expensive to practice on first. I found one at a craft store and thought it would be a sample appropriate size and price point. This Spring, as I was closing in on finishing my City and Guilds Level 3 Certificate in Stitched Textiles with Tracy Franklin and Julia Tristan, I had the deep desire to cover this box for my daughter for one of my final projects. However, a mix of looming deadlines and indecisiveness about the design direction led to me creating this sample book first. You see, I wanted to tell the story of Jane Austen's Pride and Prejudice in the embroidery but I could not decide what I wanted the aesthetic feel of the piece to be. I love 17th Century raised work, however, I found myself wanting to incorporate some contemporary techniques to help create a feel that would transport me to the misty mornings of an English Countryside.
The beginning of Quarantine (as I am sure many reading will agree) was a bit stressful, full of changes coming from every direction, and filled with uncertainty. I found myself looking for a space that provided a quiet respite from everything going on around me. I started rewatching the various Jane Austen BBC miniseries adaptations while I stitched at night once everyone else in the house was fast asleep. Then, I fell down a Jane Austen rabbit hole. The beautiful writing, the happy endings, the subtle nuances of personal relationships and Regency Britain -- she provided the perfect escape. I started reading Pride and Prejudice at night before I fell asleep, listening to the audio book when I walked or stitched and continued rewatching all the different movie and BBC miniseries adaptations. It became a bit of a family joke. My very patient husband listened to my reasoning on which film version of Pride and Prejudice was "the best". Just as a personal note: my opinion still remains that the 1995 BBC miniseries of Pride and Prejudice is my favorite overall. However, the music, color, and pacing of the 2005 movie make it a very close second and I find its soundtrack playing in my head when I read and reread the book.
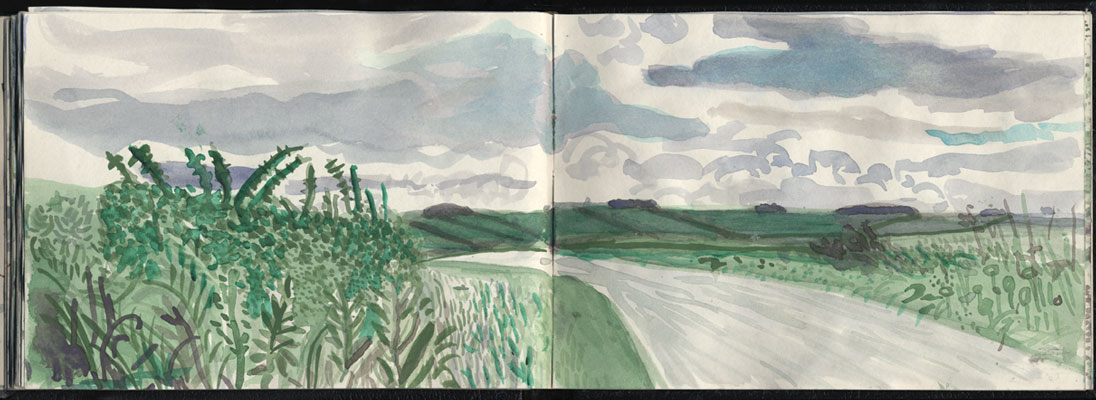
The Landscape:
I started looking at a lot of different english landscape photographs and paintings online. I finally decided upon on using photos from my friend Denny's garden outside of York as reference for the compositions. Her garden is absolutely beautiful and there has always been something so peaceful about the time I have spent there with her over the years.
I also found myself going back to David Hockney's Yorkshire Sketchbook. As I sketched and watercolored my landscapes, the question presenting itself was how detailed did I want the landscape to be on these compositions? I took a step back and relooked at Hockney's Yorkshire Sketchbook watercolors and his paintings from his exhibition A Bigger Picture at the Royal Academy of Art in London in 2012. I also started looking at Joan Eardley's landscapes. They are quite different work, but both captured the landscape in ways that intrigued me and that I thought could be interesting to interpret in stitch.
My ultimate desire for the landscape was to create that misty, romantic, quiet of an English countryside setting that the 2005 movie captures so beautifully. As I sketched, I quickly transitioned to watercolor. The first sketches were fairly detailed and as I continued to sketch, and re-sketch, and try it again, the compositions became looser and closer to the feel that I was after. I was drawn to how they both abstracted areas of the landscape and balanced the composition with specific areas of more defined detail.
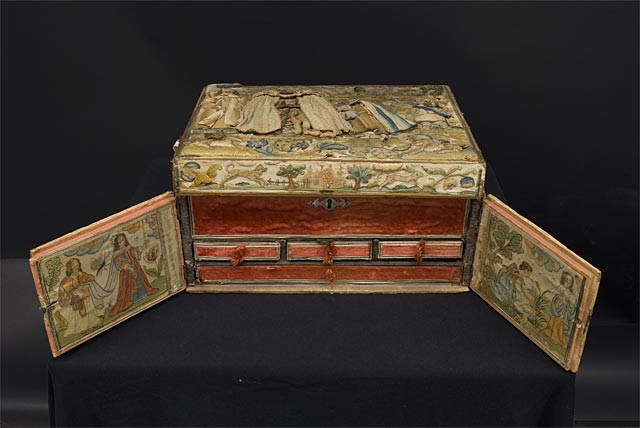
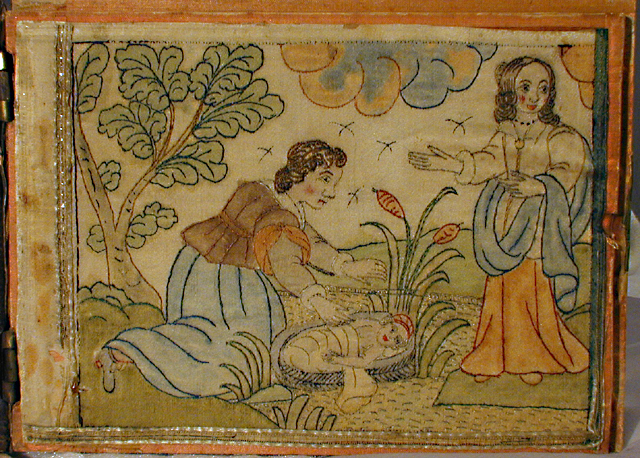
While I was watercoloring in my sketchbook, I remembered this casket that is part of the University of Albert collection. When opened, the casket reveals panels that have been painted with stitched outlines. I would love to one day see it in person! This combination of watercolor and minimal stitching was very intriguing.
I decided to try watercolors on silk and linen. On page 1 of the Sample Book, I tried different scenes watercolored on silk dupion with various levels of detail. Then on page 2, I painted the same scene using watercolors on different linens (28 count, 32 count, 40 count and a metallic linen blend). I really enjoyed painting on the silk. It was so lovely how you could build up the layers of colors. By contrast, the watercolor on the linen visibly wicked away. I should note too that two of the linens (32 and 40 count) were "raw" linen and I found that a bit dark to work on with the watercolors. The ivory of the 28 count was better, however, I still really did not enjoy how the watercolor moved on the linen.
I was not convinced in any of the painted samples, so I decided to do a set of samples with embroidered landscapes using a cotton/linen background that was digitally printed with a very loose watercolor I had done a few years ago for my Lighthouse Landscapes class (taught at EGA National Seminar in Louisville). For these samples (page 3), I also experimented with how much or how little detail to stitch.
Square 1 (top left)- most detailed, uses straight stitch, seeding and chain stitch, lots of layering in the bushy and leafy areas.
Square 2 (top right)- uses only straight stitch, any direction, but lots and lots of layers of straight stitch
Square 3 (bottom left)- completely flat, only horizontal straight stitch, no overlapping
Square 4 (bottom right)- not all flat, grass is completely flat with horizontal, non-overlapping straight stitches, hills in distance are layers of vertical straight stitch
Not convinced of the embroidered samples either, I pondered the possibilities of free motion embroidery. Page 4 shows a few samples created using solvy and free motion embroidery. The middle sample is created with many layers of just free motion (it is pretty thick, thick enough that I was concerned it would be too thick). The samples on the sides combine different combinations of silk, cotton and wool threads hand stitched in long floats onto the solvy and then lightly free motioned on top. I do not think the combination of the long hand floats and free motion are right for this project, but I will be saving this idea for future purposes!
And, still......none of the samples felt "right". I wanted something softer. Something misty. Something ethereal. Something that also would complement and not compete with the figures. I did not want lots of contrast or relief or any hard edges. I went to my scrap drawer and found strips of silk organza. I decided to watercolor over the organza and then try layering the painted strips in different ways (page 5). Layering the organza felt very organic and had the same relaxed feeling of some of the looser watercolors in my sketchbook. This felt like it was going in the direction I wanted, so I did a larger sample (page 6) and created the composition for the front cover.
As I reread Austen's description of Elizabeth visiting Pemberley, I felt that my desire for a soft background reflected Austen's approach to the landscapes that felt so important to the story but were defined so vaguely. The reader is provided with just enough detail of the landscape as is needed to create space for the drama between her characters.
The Clothing for the Characters:
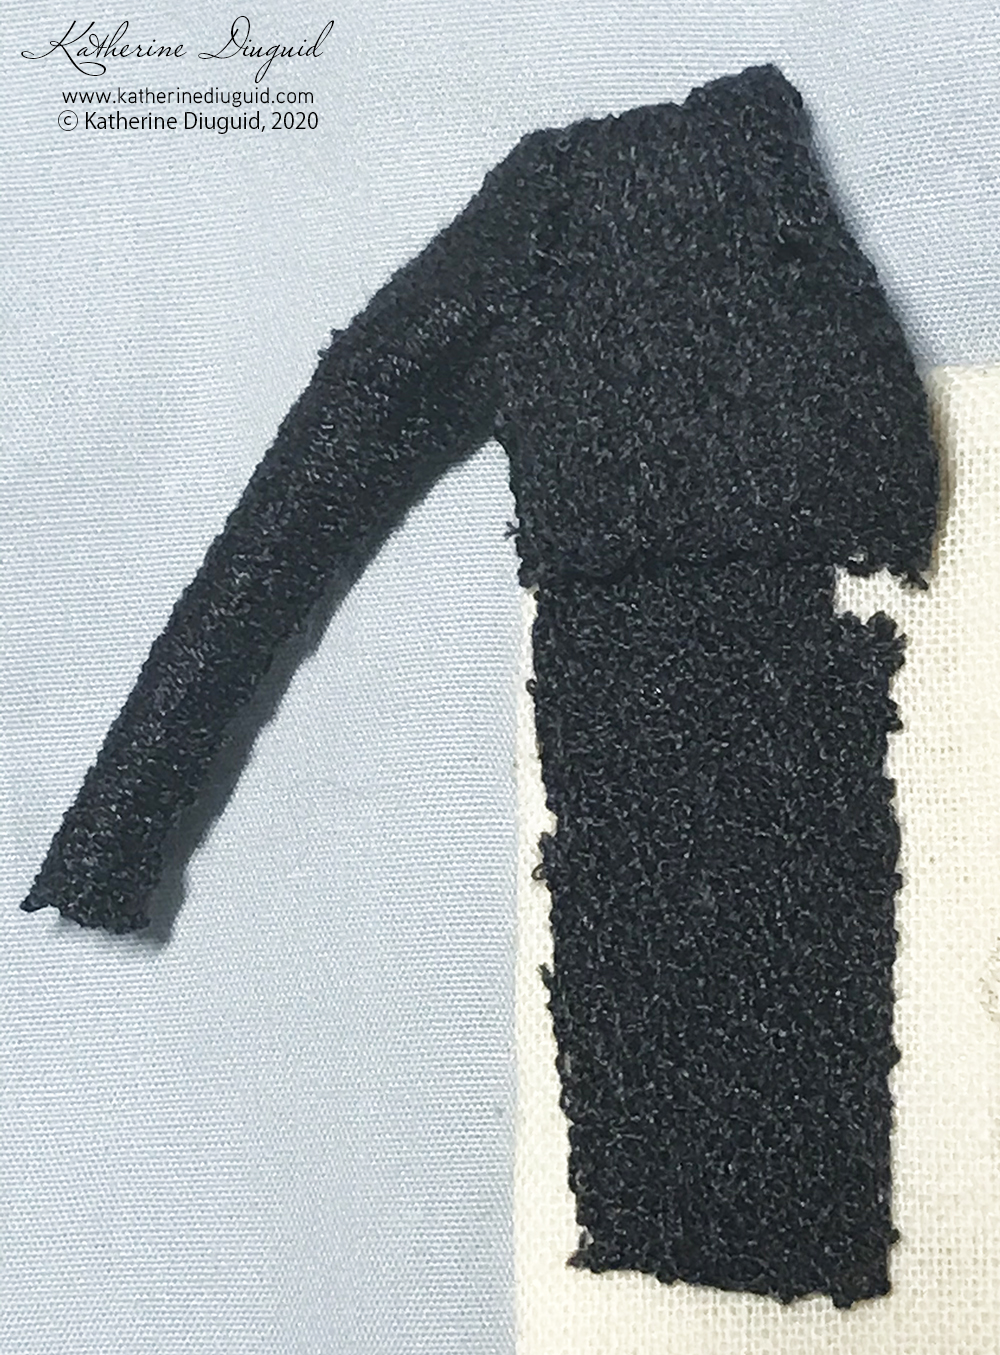
My next hurdle that I wanted to sample was the clothing for the characters. After experimenting with the free motion for the landscape samples, I thought it could be interesting to test out free motion embroidery on solvy for the clothing. I wanted to see and feel the difference between that and the hand needlelace or appliqué techniques that I have tried before.
I did a deep dive into Regency fashion and found a pattern for one of Jane Austen's silk pelisse written by Hilary Davidson and published in Costume: The Journal of the Costume Society, "Reconstructing Jane Austen's Silk Pelisse, 1812-1814" . I used this pattern for the long jacket sample and adapted it to create patterns for a spencer jacket, day dresses and a waistcoat for Mr. Darcy. For scale reference, these clothes are about the size of finger puppets.
Pages 7 and 8 of the Sample Book show the pattern and the machine free motion samples for Mr. Darcy's waistcoat (right half) and for Elizabeth Bennet, a long pelisse and a couple dress variations. Dressmaking at this scale was so much fun! It was extremely fiddly, but I was fascinated that I could still ease the sleeve into the armhole, and it was fascinating to watch the tiny pieces take shape into tiny pieces of clothing.
From these samples, I found (as I was afraid it would) that the free motion on sovly resulted in a piece that was stiffer than I wanted for the dresses and pelisse. For Mr. Darcy's waistcoat- I think it might work, but will probably choose the technique chosen for the female clothing for cohesiveness. I did try both the translucent and the mesh solvy types and neither was "perfect". On the first batch of samples, I had some skewing issues that caused the pattern to shrink up in the direction of the stitching. That issue was fixed with some patience and being very conscious to make a grid first and then, at the right speed for my machine so the correct stitch length was achieved, filling in the piece. I also made sure before putting anything together to true the stitched pieces to the pattern.
The thread that I found worked the nicest was the Sulky rayon thread. It was thinner and the final piece was drapier (see yellow above). The green is Sew All cotton wrapped polyester and the resulting pieces were noticeably thicker and stiffer.
After satisfying my questions of free motion on solvy's suitability for this project, I turned to hand needlelace. On page 9, I created a sampler of different needlelace techniques using different threads (each shade of pink is a different thread). I tried various silks by Au ver a Soie, Cotton machine thread by Valdani and Gilt Sylke Twist.
The final clothing sample on page 10 is a small handmade needlelace spencer jacket and day dress. The spencer jacket was made with Soie de Paris using a corded Brussels stitch. The day dress is made with Soie Gobelin and mixes corded Brussels stitch, double Brussels stitch, pea stitch, and Hollie point.
Final Thoughts:
Ultimately, the pieces in this book are samples, just explorations, for the small wooden trinket box that I plan to cover in embroidery for my daughter, but it felt very rewarding binding them all together in cloth book form. I purposely chose to mount the samples to the pages in a more informal way to preserve the sample quality for each exploration. I did not want them feeling "too serious". In hindsight, I am so glad that I took the time to make this sample book, and it excites me that now I have a book to go with the eventual trinket box. Creating this sample book allowed me to focus on developing alternatives and trying a few techniques that I had not tried before. It slowed me down freeing me up to further challenge myself to find the technique that I felt best suited the project not the timeline. It was a reminder of how sampling provides such a wealth of knowledge as a project develops and is invaluable when trying to sort out those tricky design questions. And, I will admit that not all of the samples created made the cut to be in the final book.
Further Looking, Reading, Listening, and Watching:
I also thought I would share some of the wonderful resources that I have found or that have been shared with me since starting this project.
An audio book of Pride and Prejudice is available for FREE via the Audible Stories website!
It is with excitement that I can announce that I will be teaching a few virtual workshops over the following months! The registration for the first of these workshops just opened. It is an introductory goldwork workshop inspired by the exhibition Good as Gold: Fashioning Senegalese Women which showed at the Smithsonian Museum of African Art last fall and was scheduled to travel to the North Carolina Museum of Art this summer.
In this workshop, students will design their own pair of earrings (or could easily be made as a brooch) that will then be embroidered using couched metal threads and metallic leather kid. All supplies needed to complete this workshop are included within the kit as well as a coordinating instruction booklet. Various design motif templates inspired by the pieces in the Good as Gold: Fashioning Senegalese Women exhibition are included within the instruction booklet.
The workshop will take place via Zoom over two 90 minute workshops on August 15 and 22 from 1:30-3pm. With the following outline:
August 15: Design motif, transfer design to ground material, padding, leather appliqué and couching.
August 22: Wiggle couching, chain stitch, and finishing
You can register for the upcoming workshop at this link. I hope to see you there!
Richard McVetis uses minute stitches in his work to create abstract compositions. I was able to see one of his pieces in person last year when I visited the 62 Group's "Construct" exhibition at Sunny Bank Mills. I love his play with negative and positive space and his minimal color use.
For this challenge, Mr. McVetis presented the idea of filling 4 shapes with different couching techniques. I love, love, love couching, so when given the challenge to fill shapes with couching I shrilled with excitement!
Over the past few years, I have been working with weeds in my creative work as a way to process my observations and thoughts about the human need to belong. During this Quarantine, I have been taking almost daily walks with my kids and have started documenting the different flowering roadside flora as I see them. A couple weeks ago, I started collecting dandelion stems without a plan but a feeling that they would be useful. I have used pressed flowers in my work before and have had the desire to do more of that recently. My kids and I made a game of picking all the spent dandelions. There were a few that still had wishes on them that they picked, but almost all of them were totally spent. They had been drying in my studio and when the challenge came to couch something I knew I had to couch my dandelion stems!
The dandelion stems dry out fairly quickly and I have not done anything to them so some have twisted and curved slightly. This does make them a bit brittle and needing some care when you stitch with them. Some of the stems were very purple and some had a really nice light green- purple gradation. I loved comparing the color gradations between all the stems.
When I went to couch them down, I knew I wanted to use fairly traditional techniques to contrast with the dried natural material. I chose silk floss for my threads as I thought the subtle sheen of the silk would be nice against the raw linen and dried stems. I also plied the silk with a thin metallic machine thread in a couple places for additional glitter.
The squares are each a different couching technique: burden stitch, basic lattice, and open basketweave. Each one is then outlined in overstretched gilt pearl purl. I stitched the burden stitch in a very closed way, concealing much of the stems as they pad the burden stitch. To contrast, I stitched the basketweave in an open way so that the dandelion stems are left more visible.
The lattice is created with mostly stem remnants leftover from trimming the stems to length for the right and left squares. The cross stitches over the intersections are alternating silk floss and silk floss plied with metallic.
I had a handful of stems with seed heads on them that surprising still had seeds even after drying in my studio. I knew I had to work these into this piece as they were so lovely dried. I couched the grouping between square 1 and 2 with cross stitches and couched the grouping between square 2 and 3 with straight stitches. The fallen dandelion seeds are couched below the squares.
In his challenge video, Richard McVetis spoke about the importance of the concept of time to his work and challenged us to consider time as we stitched our couching. As I stitched this piece, it became more and more clear to me how perfectly relevant the concept of time was to this piece. Dandelions, to me, are a great representation of time as they change so much. They grow invisibly at first and slowly dot the landscapes with dots of yellow and promises of wishes to come true. I have many memories of time spent as a child finding these plant genies and making wishes into the wind with them and now enjoy watching my children do the same thing. As I stitched this piece, seeds continued to fall off in slow motion. A gentle dance was created as the tiny seeds shifted and then fell off with each ping of the needle passing back and forth through the fabric. I felt like I was stitching the music the dandelion seeds were dancing to.
There was a delicate beauty to the seed shedding that reminded me of one of the characteristics of goldwork that I love so much--the metals age, tarnish and change right before your eyes. These dandelions looked differently when I first started couching them on. They were fuller with seeds. They continually lost these seeds as it was stitched. Thats a record of my stitching this piece. In goldwork, the metals tarnish. Living in North Carolina, the tarnishing happens more quickly due to the humidity. I have always loved the tarnishing of the metals, which is why I usually take obsessive photos during the process of stitching my pieces. They look so shiny when using new metals freshly stitched. Then they darken in unexpected ways that you cannot control no matter how hard you may try. It is the letting go of control and acceptance of this process that has provided so much love for me with goldwork pieces.
Also a fun extra-
As I was photographing this piece, I thought that the shadows, especially from the seed heads, were really beautiful as I moved it around and the direction of the light changed.
I have long been a fan of Emily Jo Gibbs work. I love the visual simplicity of her pieces created through her use of silk organza and appliqué. They seem to innately embody a quiet stillness in their subtle beauty. I have a special fondness for her still life compositions of glasses or vases with leaves and her pin cushions.
For Week 5, Ms. Gibbs challenged us to create a textile composition using her preferred technique of appliqué. In her Challenge Video, she demonstrated how she utilizes silk organza for her appliquéd pieces and suggested that we find a stick to use as inspiration.
I started this piece by playing around with different compositions on my desk. I know she used a stick in her challenge but I wanted to do more of a composed composition. I usually keep weeds from recent walks in a milk glass vase on my desk and I thought that would be a nice subject. I photographed it with a few different groupings of weeds. I did not dislike them, but none of the compositions were feeling particularly special.
Taking a break from composition iteration, I got my bin of eco-printed off-cuts out to pick out some fabrics to use. I grabbed a piece of raw silk that I have over-eco-printed a number of times, most recently with marigold petals. I wondered if I could use this piece in a way that I could make it feel like petals falling on the table like I did the previous week by couching the fallen dandelion seeds down. I decided to use this piece for the bottom portion of the ground and pair it with a piece of raw linen (40 count).
Having basted my two ground fabrics to a muslin backing, I returned to sketching and playing with the composition with fresh inspiration. Since the main eco-printed piece I was using was from marigolds, I decided to place a marigold from my garden in the vase and sketch it. The vase holds a lot of special meaning to me. I have long collected vintage green and milk glass, and when my husband and I got married, his grandparents gave us their collection of milk glass. I also thought this would be an interesting challenge to interpret the relief on the vase with just simple stitching.
Finding fabrics to render each part of the composition was quite fun. I chose silk charmeuse for the vase for its shine. The silk for the leaves was off cut silk dupion bits that I watercolored over as I could not find a good green in my bin. The fabric for the marigold blossom was tea-stained silk organza, and the shadow was created using some silk organza that I had eco-printed with rose leaves. All the threads I used were variegated cotton flosses.
Anne Kelly's folk art inspired textile and mixed-media pieces are whimsical and filled with many beautiful details. She also makes really lovely mixed media books. She has authored a number of books, which I highly recommend (Textile and Nature is one that I especially love).
I find Ms. Kelly's work really interesting as it combines simplified shapes with a covering of stitching that creates a complex web of motifs and imagery. I had never tried the technique of machine topstitching over the entire surface like this before and was very intrigued to try it. I had no clue how different the before topstitching v. after topstitching compositions would look.
So I have to admit that at first glance, I did not know what to do with this challenge. I sketched a lot of different ideas in my sketchbook ranging from fairly simplified to more filled with different motifs--more directly folk art inspired compositions. Originally, I thought I would use my birdfeeder as inspiration as I love Ms. Kelly's birds and birdwatching is something my kids and I really enjoy. As I sketched and laid scraps of fabric out, though, I decided that since this was a new technique to me, I would try to reinterpret the same vase from Week 5 and combine that with the Dandelion motifs from Week 4.
Once I had an idea for the composition, I got my bin of scraps back out. I have a lot of scraps from eco-printing that have these lovely lines in them from the strings used to bind the bundles. The very outside fabric of the bundle takes the color of the boil water and the string that binds the bundles acts as a resist. The background of this piece is a collage of string resisted habotai silk pieces. The habotai has a lovely sheen and is slightly sheer so when the pieces overlap it creates darker areas.
I used satin and Chantilly lace for the vase and layers of dotted tulle for the dandelion seed heads. After I had everything pinned, I machine topstitched the entire surface. This part was so cool as I did not realize how different it would look after the topstitching! Then I added extra details with machine free motion embroidery. I wanted this piece to be completely machine stitched.
I have already started another experiment with this technique-- I am so intrigued by it right now! It is a similar background but a different composition and I think I'm going to embellish it with a mix of hand and machine.
I have really enjoyed participating in the Community Stitch Challenge hosted by TextileArtist.org . I want to say a thank you to them for organizing such a wonderful project and such a great mix of artists to challenge us each week.
I decided to join TextileArtist.org 's Community Stitch Challenge as I thought it would be nice to have a given prompt each week while we are all on Stay at Home orders. The projects are smallish and I felt like I could accomplish them while still doing everything else needed right now. We are currently on Week 4 and I have so enjoyed both the prompts provided by each different artist and most especially seeing all the different interpretations by everyone else stitching. If you get a chance, you should check out what everyone is stitching here at: https://www.instagram.com/explore/tags/communitystitchchallenge2020/
Week 1 with Sue Stone: Pick 1 stitch and explore it in 4 squares.
I have admired and followed Sue Stone's work for years and would love to take a workshop with her at some point. I love her focus on exploration of simple stitches used in very effective ways to render and create texture. For her Week 1 Challenge, she suggested that we pick 1 stitch and explore it in 4 squares. I picked Running Stitch as I feel it is the most amazingly versatile stitch.
I began my Running Stitch Sampler by cutting 4 squares from some old eco-print off cuts. These bits are from a batch of eco-prints using rose leaves on raw silk that I did while teaching at Arrowmont in 2017. I wanted to take 2 squares and explore stitching the negative space of the rose leaves and explore stitching the positive space in the other 2 squares. I also wanted to play with color mixing using colors that complemented the eco-prints and for the most part were of a similar value to the fabric.
Cas Holmes' work combines drawing, watercolor, hand stitch, free motion embroidery, and appliqué to create beautiful fiber collages. For her Week 2 Challenge, she suggested that we look at objects that are currently around us and blend that with the exploration and memories of place.
With this collage, I wanted to challenge myself to again incorporate bits of my eco-print off cuts and I also wanted to challenge myself to get my watercolors out and experiment with them. I have to admit that I had forgotten how much I love to use watercolor! The collage part was daunting to me, partly because I could not decide if I wanted a formal composition or something that felt less formal and more sketchbook-like. I want to do more of this as I found that as I stitched I wanted to be looser with the composition.
The green glass is one that has sat on my desk for years. I love green glass and collect it and this is part of a set I found at a Goodwill years ago. I have watercolored it on just normal mixed media sketchbook paper. It was interesting stitching the paper onto the fabric and thinking about the stitch placement on the watercolor. The weed is one that I pressed last summer that I found in a parking lot. It is layered with a bit of Chantilly lace that I had that had a floral pattern that was a similar shape to the pressed flower.
The clover was another old eco-printed bit. I had hammered it into the linen a couple years ago and did a bit of whitework into the negative space. The other bits are bits of eco-prints of rose leaves on raw silk and Appalachian ragwort on silk charmeuse.
Emily Tull is a textile artist in the UK and you should check out her needle painted portraits. I love her play with negative and positive space and her choices of which areas to embroider.
For Week 3, Emily challenged us to stitch an eye-- that statement sounds so simple. So, I must admit when I first watched her challenge video, I was a bit daunted by it. I started back in my sketchbooks before I stitched anything-- I needed a bit of time. I looked through old photographs and sketched some eyes and then my kids graciously and enthusiastically modeled different poses. (My daughter got so into this that I found about 50 selfies of her eyeball on my phone shortly after this-- I will readily admit their excitement was contagious.) After sketching, I moved to a bit of colored pencil and then to watercolor. The watercolor was really interesting as it satisfied my love of color with intense study of these eyes and provided the extra bit of courage I needed to jump in with my needle.
For the first eye I stitched, I chose to use an acid green and 2 purples. I originally made this decision because I wanted to play with color. Looking back now, I think it actually gave me a bit of distance from the pressure of making the eye look too realistic. After that pair of eyes was finished, I just kept stitching more and more eyes. I stitched some eyes with just 1 color, some with just 2, some with just 3 and some with as many colors as I felt necessary. I stitched the same pair of eyes in a single color three different times to see how just that change of color affected the emotion of the eyes. I stitched some in 1 strand and some with 2 strands. I wanted to explore how much I needed to stitch to communicate an eye and how much I could stitch to make it feel more realistic. With each eye, I posed a separate question to myself to address. I may go back and add some more eyes to this, but for now, I'm calling it finished.
A note about the ground fabric of my Eye Sampler: These are all bits of different eco-print off cuts that I appliquéd to a cotton muslin base. There is some raw silk, silk charmeuse, silk matka, silk dupioni, and linen. I worked this piece all in hand (no hoop) to allow the natural hand tension to add more texture.
A note about the threads: The threads are mostly Weeks Dye Works and Valdani cotton floss but I also stitched a little using Valdani's sewing thread 35wt. There is no black on this piece. I wanted the added challenge of using color mixing and color theory principles (value and complementary colors) to create the contrast needed to render these eyes.
Now back to my studio to stitch Week 4 with Richard McVetis.
After smoothing out a couple of the leaf outlines and making the top fillings in the leaves slightly darker, I think it's finally finished. I've stitched this piece with Appletons Wool on Linen with a bit of DMC Diamant. Below are a few photographs of the finished piece. Now, to the sketchbook to plot the next piece!